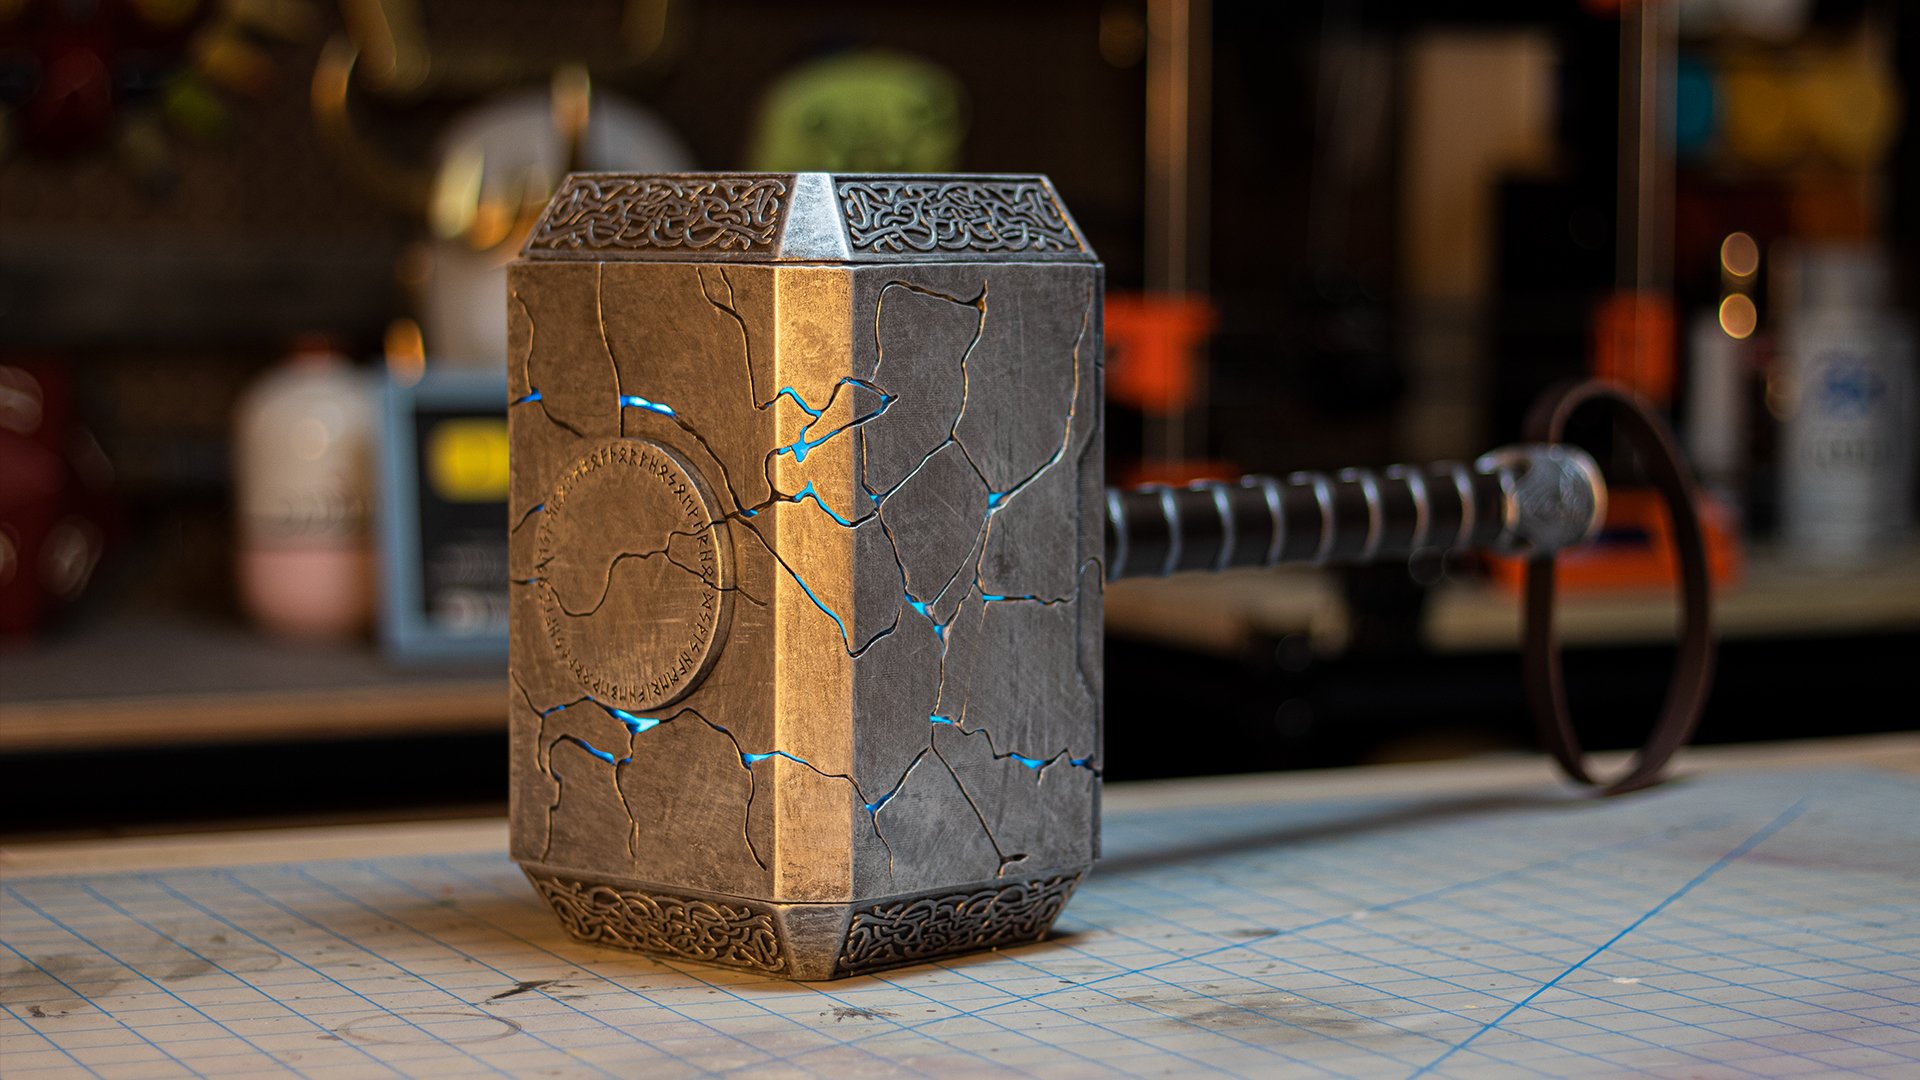
How to Make a 3D Printed Thor’s Hammer (aka Mjolnir) from Thor: Love and Thunder
As soon as we saw the trailer for Thor: Love and Thunder, we knew we had to add this build to our list. Then, Do3D reached out and offered to sponsor our build by providing their incredible 3D printed Thor hammer model. Their files are expertly crafted and the finished product looks just like it does in the movie.
Today we’re walking you through all the steps to go from this 3D print of the newly-reforged Mjolnir to a fully-finished prop – complete with lighting!

Our Materials List
Here is everything we used to print and finish our cracked Mjolnir hammer.
Disclosure: Our recommended products contain affiliate links, and we only recommend products we would use ourselves. Using these links is no additional cost to you, and we may earn small commissions to help grow the channel!
3D Printing
Do3D 3D Printing File (search: cracked mighty thor mjolnir)
Finishing
Lighting & Electrical
Step 1: 3D Printing

Printing the Hammer Head

It was super important to us that all intricate details of the cracked hammer came through in the final product. For that reason, we printed the majority of the parts in resin on our Anycubic Photon Mono X using Elegoo water-washable resin. We used auto supports and also added a few manual supports in key spots to make sure the piece printed with no issues.
The folks at Do3D did an amazing job making this model appear cracked and super detailed while printing in one piece. We did however have to split the hammerhead in half to fit within our printer’s build volume. Nothing a little glue can’t fix!
Printing the Hammer Handle

For the handle, we stuck with traditional FDM printing with our Prusa i3 MK3S+ 3D printer and Polyterra’s PLA Plus. The file is also designed to house a ¼” threaded steel rod. Together, the material and the rod will ensure that the handle is sturdy and secure for any action shots.
The handle was slightly too long to print in one piece on our Prusa MK3, so we ended up clipping the top off ever so slightly. We didn’t notice any issues with the overall strength or fit as a result of our change.
Step 2: Pre-Assembly
Like we mentioned, we had to split the hammerhead in half to fit within our resin printer’s printable area. So, assembly starts with gluing it back together!
We started by tack welding the pieces together with a little CA glue. Then we went back in and reinforced all of the joints with two-part epoxy.

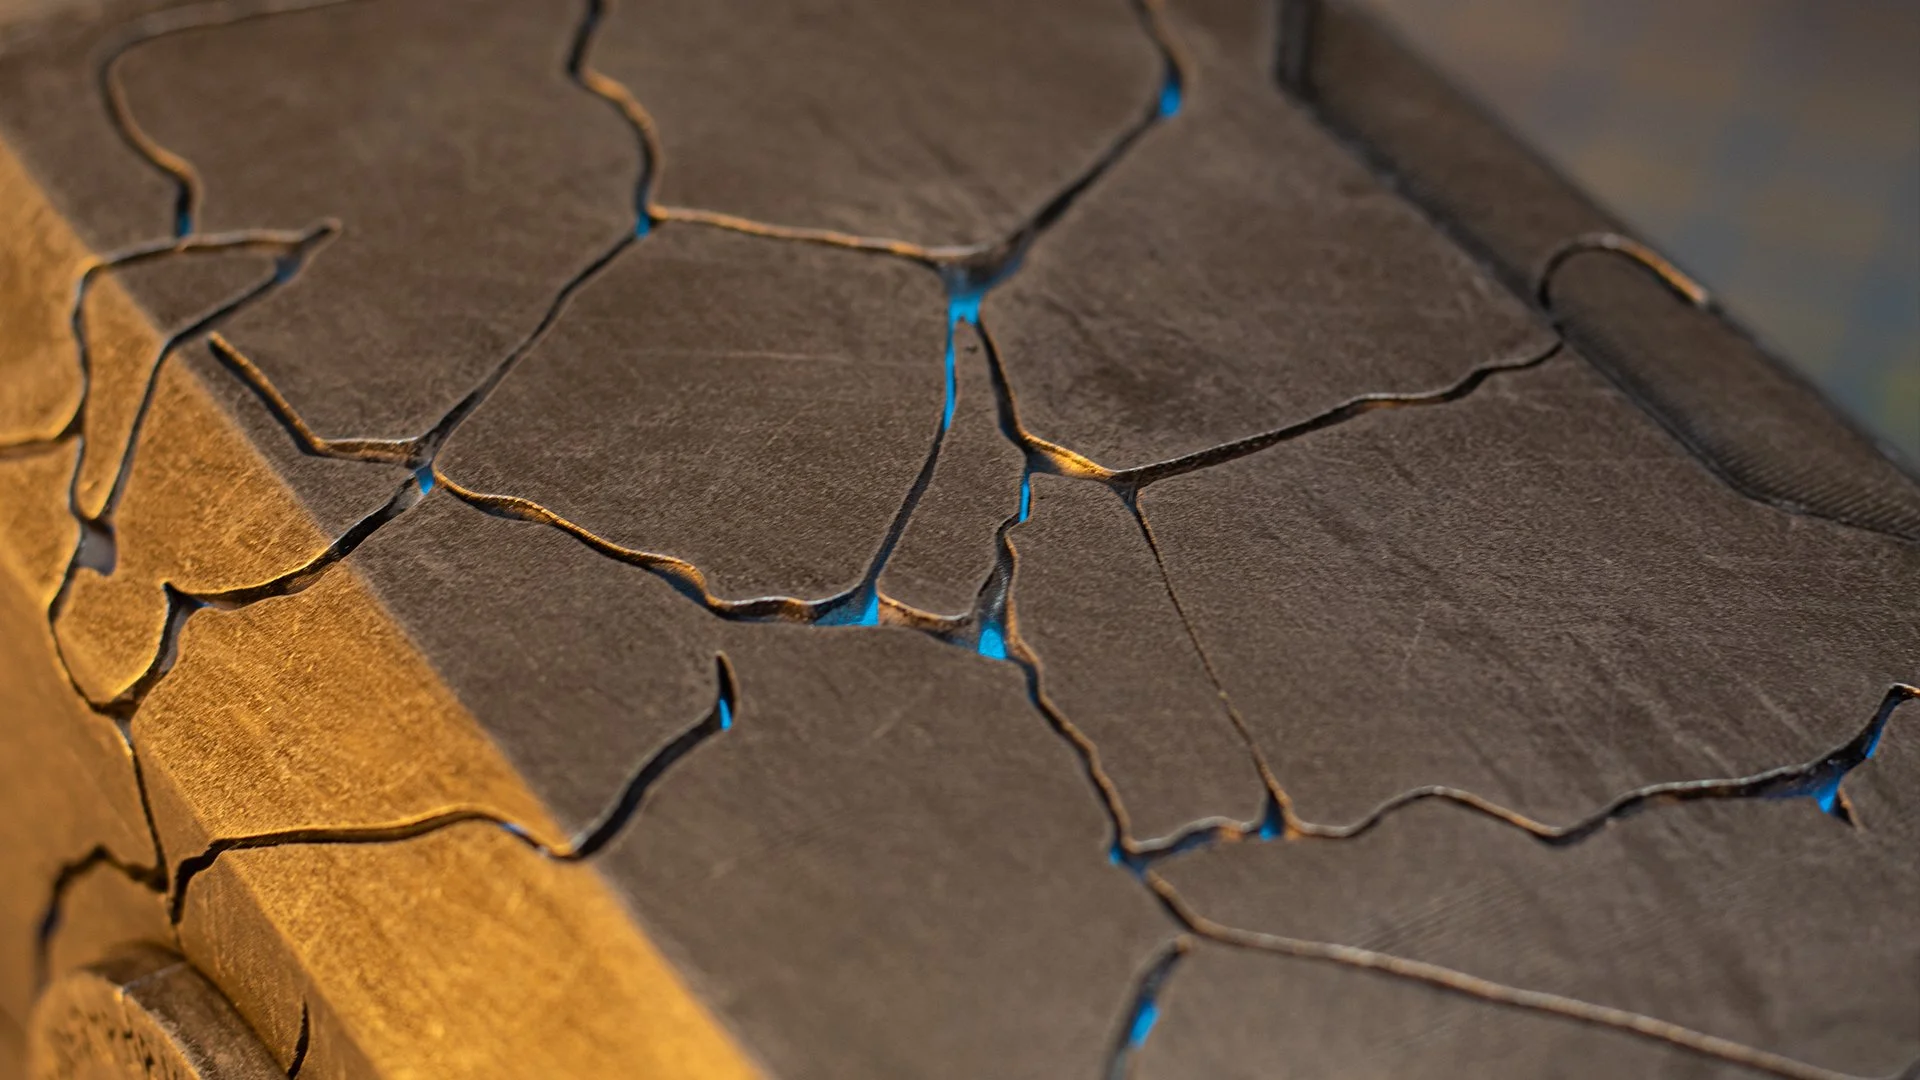
To reinforce the joints, we mixed our epoxy and liberally covered the seams on the inside of the hammerhead. We took extra care to fully fill in the gaps between the two halves. The epoxy dries clear so if you get any in the cracks, the light will still shine through (but we tried our best to be neat).
We ended up doing two coats to make things extra secure – we don’t want this cracked Mjolnir falling apart…again.
While we had our epoxy mixed, we also glued the two handle pieces together. And, we found that our printer left a few gaps on the hammerhead, so we filled those quickly with some wood filler.
Step 3: Sanding
The head of our 3D printed Thor hammer is resin-printed – but we still like to do a little sanding for the best end result. We did a pass over everything with some 220 grit to prepare for painting. To keep the edges sharp and the faces flat, we keep the sandpaper on the workbench and pass the piece over it.

For the pieces that are too big for our tabletop sanding trick, we wrap a piece of sandpaper around a block of wood to keep everything flat and even.
Then, it was time to handle the filigree inserts. To our surprise, Mjolnir is not a perfect square, which means there are two sizes of inserts. We checked and marked the corresponding pieces and their slots so everything will end up where it belongs. Now we can fine-tune the pieces with a little more sanding.
Step 4: Assembly
Once all the sanding was done, we mixed up some epoxy and started assembling the rest of the hammer, starting with the filigree inserts.

Next, we got to work on the end caps. The file is designed with two removable end caps that are held in place with magnets. Our lighting rig only requires one accessible end – so we sealed the other one up permanently with our two-part epoxy.
David says: “Sealing one end will make final assembly a little tougher. If you’re on the fence, read ahead to Step 9 to see how it worked out for us.”
Step 5: Priming (and More Sanding)
We’re finally ready for our first coat of primer. The store was out of our regular primer, so we decided to try out this new rusty metal primer (spoiler alert, we didn’t love it). We gave everything a pretty thick coat to fill in any remaining imperfections.

David says: “Empty filament spools make great painting platforms.”
After everything was dry, you guessed it – we did another round of sanding. The rusty metal primer sanded down okay, but we think we’ll stick to our sandable filler primer in the future.
Finally, we glued the primed top cap in place with epoxy. We scratched the surface with a blade to get a good bond. Make sure you line up the crack details!

Step 6: Painting
Finally, it’s time for some paint to make our 3D printed Thor hammer look a little more like the real thing. We started with a metallic silver (this particular color is our favorite metallic rattle can paint of all time) for the hammerhead and handle accent pieces and a cocoa brown for the main handle to get that leather-like color and texture.

Next, we needed to add the silver bands on the handle. We started by taping off all of the sections we wanted to stay brown using Frog Tape for delicate surfaces. We’re all about getting the cleanest possible lines, so we used a toothpick to press the tape down into the seams. Then we used a sharp new blade to trim away the tape and mask the brown areas of the handle. It’s tedious, but it’ll pay off at the end.
Step 7: Weathering
Our silver paint looks good – but it’s a little too shiny and perfect for a hammer that’s been through thousands of years of battle, did some avenging, was shattered by your sister, and reassembled by your ex…you know, standard wear and tear.
Black Paint
We started with a coat of watered-down, black (okay, technically dark brown) acrylic paint. Cover everything with the black wash and then wipe away the excess. The black paint will settle into the cracks and recesses to slowly build up a layer of weathering and make the details pop.
We used a very similar process when we made Dr. Strange’s spell box. It looks terrible at first – but don’t worry. Trust the process!
David says: “When it comes to weathering paint, the cheaper, the better. It’s not good for painting, but it’s fantastic for this!”

Then, to add some depth to the finish, we dry brushed the entire surface with black paint as well. Just like with the wash, this will look bad at first, but is worth the added work. Build up the finish layer by layer, adding paint and buffing it with the brush in short, light strokes.
Gilding Wax
At this stage, our hammer looked a lot more like it was actually used in battle, but it felt a little dull. So, we followed our black paint up with some silver gilding wax, a trick we learned from PropsNstuff. The wax will bring back that metallic shine while keeping the deep, weathered look, just like in the movie.
We applied the gilding wax with a cheap fan brush, slowly building it up in light layers going in all directions. This gives the illusion of scratches, depth, and an overall more worn look. We love this step, because it’s when the hammer starts to legitimately look like an ancient piece of metal.

Step 8: Electrical
Wiring the Lights
Now that the body of our 3D printed Thor hammer is looking good, it’s time to bring it to life with some lighting. We went with a nice electric blue LED that matched the lightning color of the movie prop really well.
We wired in a switch and a coupler using some wire nuts. The coupler allows you to connect to a battery pack for mobile use or to plug into the wall for display purposes.

David says: “I’m not an electrician! This diagram is meant for informational purposes only. Don’t attempt any wiring of any kind unless you have the knowledge required to do so safely.”
We also built a simple lighting rig to house everything neatly inside the hammer. It threads onto the central rod to keep it still and secure. It’s nothing fancy, but it holds the batteries and a small counterweight just fine. We actually forgot to put our counterweight in, but some sand capped off with hot glue should do the trick.
Adhering the LEDs
Now that we have our electrical rigged up (and our lights working), we need to adhere the LEDs to the outside of the lighting rig. We applied them in a tight spiral, wrapping their way around the rig.

You can safely cut most LED strips at the little copper plates in between the lights (maybe we’ll use our leftovers for a Kenobi project). And, don’t forget to do a quick test of your lights before you stuff the rest of the wiring inside the rig.
Step 9: Final Assembly
At last, we’re ready for final assembly. We started with the handle, gluing the two pieces together with some epoxy. We then added on the pommel, making sure that the higher sides of the pommel lined up with the corresponding flat spots on the handle.
Next, we screwed our 18” steel rod into the handle. Now that the handle is totally complete, we can assemble the entire hammer.
Because we sealed one end of the hammer shut, we started by putting a little Poly-fil in that end (since it would be hard to get to later). The Poly-fil helps to diffuse the lights and make them feel less harsh.

This is where it all comes together. We added epoxy to key spots on the hammer and the rod, then placed our lighting rig inside the hammerhead with the switch and battery facing the open side. Then, we locked everything in place with the handle, making sure the pointed details on the handle align with the striking surface of the hammer. Finally, we added a little bit of CA glue to hold everything together while we get it taped in place to cure.
Step 10: Finishing Touches
Now that our 3D printed Thor hammer assembly is complete, it’s time to finish up this project with the handle strap. We cut our leather down to roughly ½” wide by 18” long using a blade, a ruler, and some tape to keep everything in place.
We glued the strap in place with a little epoxy and a touch of CA glue. Then we stuffed the rest of the hammer with some more Poly-fil to disperse the light and give us the even glow we were looking for.

Final Thoughts
If you made it this far, thank you so much for building your very own 3D printed Thor hammer alongside us! If you have any questions or run into trouble along the way, shoot us a message. We want our projects to be fun and approachable for as many people as possible.


Thanks again to Do3D.com for supplying the amazing STL files for this project! Be sure to check out their wide variety of 3D models on their website (including several other Marvel 3D prints that we’ve already built). Their files are a pleasure to work with and are incredibly accurate to the source material.
And, if you enjoy our YouTube videos or our build guides, please consider supporting us on Patreon and have your name featured in our videos! Thank you for your support!