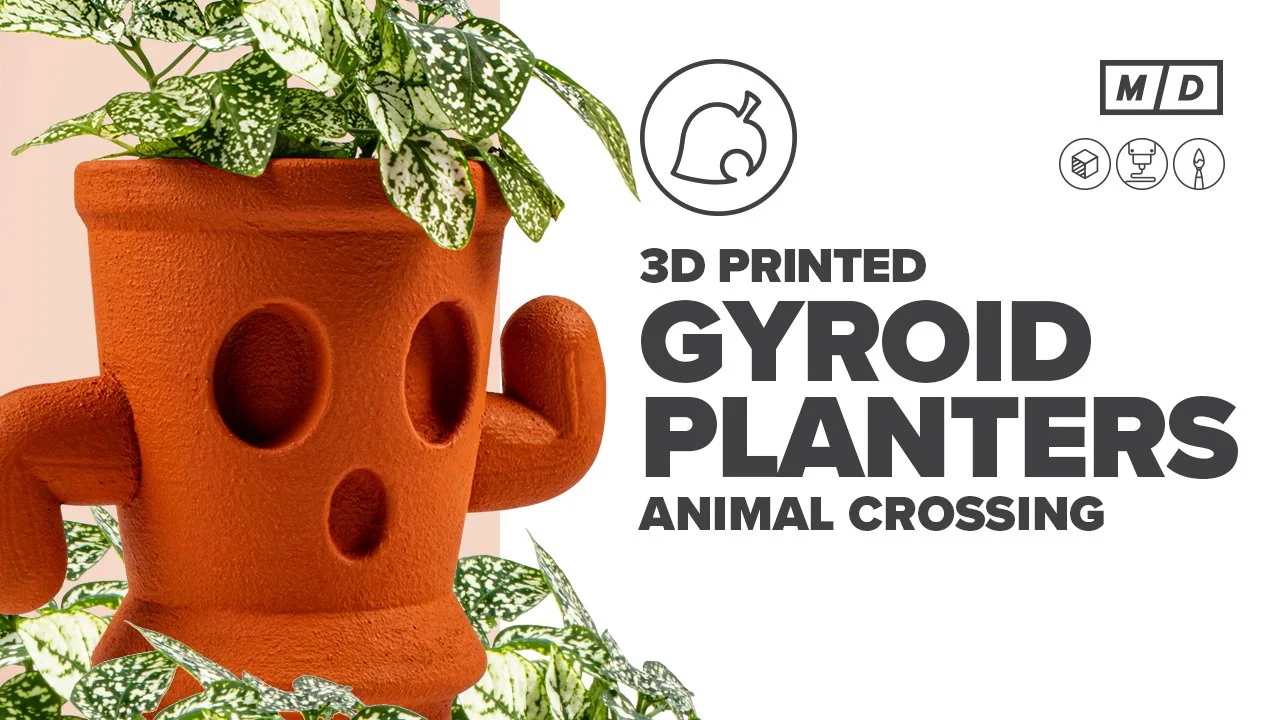
Animal Crossing Gyroid 3D Print: Planter Build Guide
We are big fans of Animal Crossing and even bigger fans of the adorable gyroids found around the island. We’ve seen a couple files for these guys online, but we wanted to design our own version that:
Required zero supports (so it’s super beginner-friendly)
Had adequate drainage (so it can support a real plant)
And fit a standard size pot (so the PLA doesn’t get water damage)
Here’s how to build and finish your very own Animal Crossing gyroid 3D print!
Our Materials List
Here’s everything we used to print and finish our gyroid 3D print.
Disclosure: Our recommended products contain affiliate links! If you end up making a purchase from one of the links below, we’ll receive a small kickback (at no cost to you) that helps support our channel and future products. We only recommend products we would (and do) use ourselves.
3D Printing
PolyTerra PLA Plus - This is a great project to print with colored filament too, making it even easier!
Finishing & Painting
Planter Saucer - we picked ours up at the local garden center
Step 1: Designing & Printing
We wanted this project to be beginner-friendly, so we designed it to print without any supports. If you want to get into 3D printing but aren’t sure where to start, this is a great first project.

Our files come with everything already oriented for easy printing
Our STL file is sized to fit a standard size mini flower pot when printed at 100%. Using a separate flower pot will keep dirt and water from coming in contact with the PLA filament. And, the mini pot inside has drainage holes so you can easily water your plant and place it back in the gyroid planter.

Step 2: Assembly
The arms print as two halves to eliminate the need for supports. A little glue is all you’ll need to assemble them.

Now that the arms are assembled, it’s time to fit them into the main body of the gyroid planter. Using a utility knife, trim away a little material at a time until the arms fit perfectly – no glue, all friction. Just push them in with a little bit of pressure until they line up with the inside edge of the planter's body.

The fun thing about this design is that you can orient the arms however you like! We went with the classic one-up one-down setup.
Step 3: Painting
One of the best things about this print is that it doesn’t require any sanding! Instead, we opted for a thick coat of primer and a coat of textured spray paint to hide the layer lines. The paint also adds a convincing stone texture to our Animal Crossing gyroid 3D print.

Finally, finish off your gyroid with a few coats of paint in your favorite color. We went for yellow, blue, green, and classic terracotta. To get that matte, chalky, stone-like finish, we mixed equal parts of standard acrylic paint and unsanded grout. When the consistency is similar to thick pancake batter, you’ll know you have it right.


We recommend applying the paint with a cheap foam brush to avoid having to clean the gritty paint out of a nice one.

David says: “If you’re following along at home, make sure you pick up unsanded grout – sanded grout won’t work!”
Step 4: The Finishing Touches
Like we mentioned at the beginning, if you want to use your gyroid for a real plant, you’ll need two final additions – a saucer and an internal pot (the ones linked here fit perfectly!). This way you can easily water your plant without making a huge mess or drowning its roots.

Final Thoughts
We love how simple and fun these gyroids are. Whether you’re a seasoned 3D printer or have just set up your new 3D printer, you can achieve a great finished product. The gyroids can be printed in a single afternoon and best of all – no sanding!

If you do build a gyroid yourself, be sure to tag us on Facebook or Instagram – we’d love to see these little guys in the wild!
And, if you enjoy our YouTube videos or our build guides, please consider supporting us on Patreon and have your name featured in our videos! Thank you for your support!